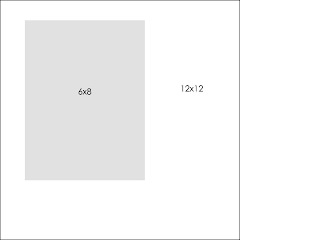
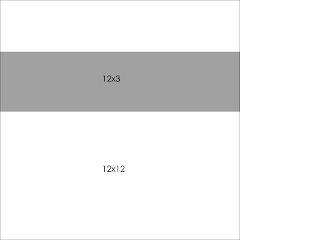
First, you need to decide what size you want your collage. I did a few basic "Layouts" for my scrapbook pages and then chose the picture sizes in the collage afterward. Since I do both 12x12 scrapbook page and 8.5x11, here are a couple (the gray is the collage, the white is the whole scrapbook page)
{8.5 x 11 Page with an 8.5x6 collage}
{12x12 scrapbook page with a 12x3 collage}
(this was printed on a 12x12 canvas through my pro lab)
Ok, once you kind of think out what size you want the FULL collage, you need to figure out what size the pictures will fit. This involves a little math and figuring out ratio of pictures (vertical and horizontal etc...) but my suggestion would be to sketch out the layout on a paper and use a ruler to measure and see what will fit. Maybe later I'll post some basic layouts with the photo sizes... I'll have to make that up though. I usually play it by ear when I make collages... I pick out my pictures and try to fit them in.
The one I'll do today is a 6x8 collage. The images are as follows: Six 2x3 images and Two 3x2 images (width is listed first, height is listed second... ie... 2x3 is a 2"wide pic by 3"height pic)
So.. on to making the collage.
1. Open Photoshop (I have CS2 so if you don't, hopefully these steps will still be similar...). Go to File > New

2. A box will open and you will select the size you want your canvas. You want to do this in "inches". If you want a 6x8 Collage, change width to 6 inches and height to 8 inches. I always do my resolution at 300 pixesl/inch. IMPORTANT: Make sure your resolution on your canvas and your resolution on the pictures you crop are the same. Don't worry about this right now, just make sure you remember what resolution you set the canvas at in this step.
(note: in this picture I'm making an 8x10 canvas... but the collage is a 6x8 so just ignore this part that says 8x10....)

3. Open the pictures you wish to use in the collage.
4. Crop the pictures to the size you want. Select the crop tool (arrow pointing to it). Change the Width and Height to whatever you want the picture to be. Make sure the resolution (circled) is the same as what you made the canvas. I just always use 300 pixels/inch.

5. Select the area of the picture to crop. (hold curser on corner of pic, drag to select the area of the picture you want, and then hit enter)
6. Choose the "Move" tool (circled). Click on the picture that you just cropped and drag/drop it onto your canvas. Once its on your canvas you can move it around to whatever position you want.

7. Repeat Step 6 for all photos on the collage. Just change the width/height to whatever size you decided you need and then drag/drop it onto the canvas. Then, arrange the photos.
8. Once your collage is arranged, go to Layer > Flatten

Now your image is a flat 6x8 canvas. If you want to print them out at Target/Walmart etc... where they have the basic 5x7/8x10 sizes... you might want to make the canvas an 8x10 so that you can print it as an 8x10. (some online places you can order custom sizes like 6x8, but I'm not positive...).
To make the canvas an 8x10 you will:
1. Go to Image > Canvas Size

2. A box will pop up like this:
 You will change the Width and height to 8 x 10. (Now... remember... if you do a collage that is, say 9 inches wide by 4 inches height you'll want to make the canvas width 10 inches and height 8 inches. If you do the width 8inches, you'll lose an inch of your collage). Since the collage we made was 6 inches wide by 8 inches high, I'll leave the height 8 inches and just change the width to 10 inches.
The Anchor toggle thing down there... The little white box represents your image (or your collage). When you change the width or height, those arrows tell you where the extra width/height will go. The white box is in the middle, so the canvas will expand on all 4 sides like so...
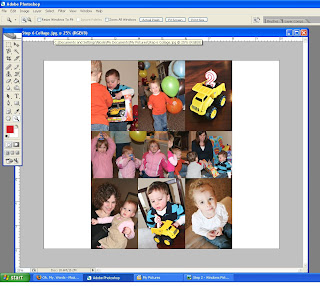
Now, if I click on the top left corner and put the white box in the top left corner like so...
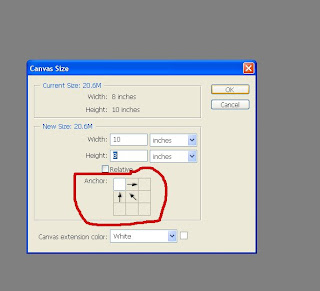 The collage will stay in the top corner of my 8x10 canvas and the "blank" space will go to those two edges where the arrows are. Like this:
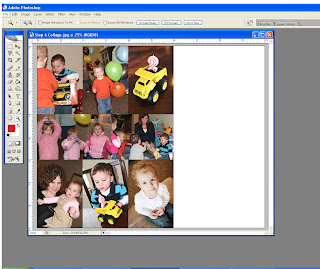 You can do it either way. I usually push the collage to the edge that way when I print it as an 8x10 I just have to chop off that one white edge and not cut all the way around my collage.
Now you're finished. Go to File > Save and save it. You can then upload it to whatever online place you print through. Make sure you print it as an 8x10. I'll print out with that extra white space (it'll be like a blank photo on that side) but all you do is cut off the collage part and voila!
If you have any questions, leave a comment and I'll do my best to explain! I hope this wasn't too confusing!


Ok, now I just need to learn to use photoshop. I think I may take a class, I'm pretty dumb when it comes to that program! I will have to bookmark this post though, for future use!
ReplyDeleteyeah!!!! i can't wait to try this!!!
ReplyDeleteOkay, this must have taken you FOREVER to write. But, thank you. I am glad that you did. :) I have been wanting to learn how. LIke Michelle said, I am going to bookmark it so I can reference back to it.
ReplyDeleteTalk to you later.
Ps. I am not going to make Church. :) hahah...I am guessing you already knew that. I am sorry I didn't call..We slept in and had a late breakfast. I totally forgot.
Nicole!! I love you!! This looks like a great tutorial!! I can't wait to try it out, In fact I'm just gonna print it out... Do you have copyright on this tutorial?? is it printable? lol.. thanks for taking the time in helping us out with this!
ReplyDeleteyou have the patience of a saint. i hate trying to figure out how to teach things, you did a great job! must be why you're teaching??
ReplyDelete