
I was itching to redecorate the mantle. I'd had the same mirror up there since we moved in, and though I'd changed the little nick-nacky decor on the mantle I felt like it was time for a good change. Of course, Pinterest was the sources of my inspiration. I have a board for mantles and decided to pull together some of my favorite elements and create something springy.
I knew I couldn't/didn't want to spend money so I used items I had around the house. The board art.... made from a fence panel! Scroll down for directions (though I did not take pictures. I suck at photographing how-to's) .
I still need to have the board hung... right now it is just propped up on two little pots. I plan to raise it about 6" or so, so that the candles/plants etc aren't in the way.


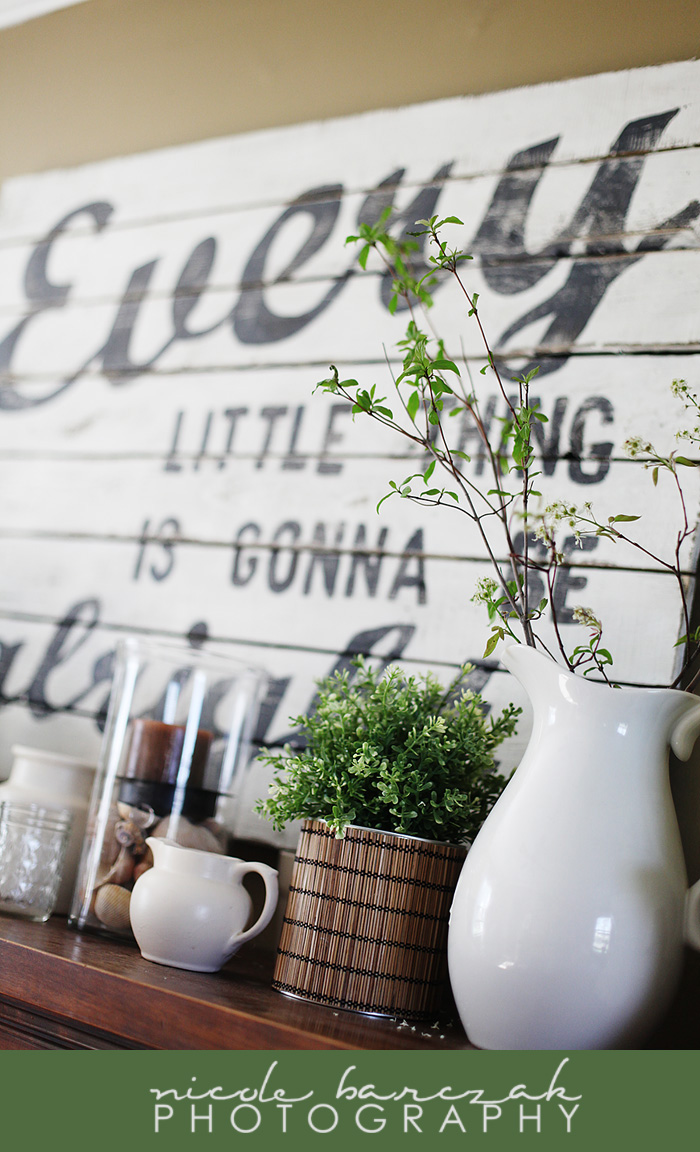
I had lots of ideas for the mantle wording (check out my Pinterest board for it), but I kept envisioning this typography. It is super similar to the artwork in baby sis's room and originally I thought I wouldn't like both being so similar. However, I couldn't get it out of my mind. So, similar it is.
I started off with a fence panel. We had a leftover piece from putting up our privacy fence so I just used that section. (The panel was a 4x8 panel). I cut off the notched top and shortened the ends so the entire artwork board was 30x42 (or somewhere similar in that range).
Then I sanded it down along the top and edges to smooth out the roughness a little. I didn't put too much effort into it because I wanted it to look rustic and distressed and knew the roughness would help.
After sanding, I put a coat of dark walnut stain on. This way, when I distress the paint at the end, the stain will show through.
Once the stain dried I put a coat or two of white paint on and let it dry.
Now for the difficult part.... the font. If you're familiar with Photoshop, this is pretty simple. If not, well..... play around :)
1. Create a new canvas in Photoshop the size of your board/fence. Mine was 30x42. (72ppi)
2. Type the wording onto your 'canvas" in PS. I used two different fonts, and angled the word "every". You can do this in any way you like... move the words around, change the sizes, stretch it out etc.
3. Then, using the "rulers" on the edge of the canvas in PS I pulled out gridlines every 8 inches across and every 10 inches down. This created 15 different 8x10 grid spaces. (there was a 2" space on the far right that I didn't worry about)
4. Then I used the Rectangular Marquee Tool to "frame" around the first 8x10 grid and cropped it. Saved it as "1". Then I hit "edit" "Step Backward" so that my entire canvas showed again. I took the Rectangular Marquee Tool and framed/cropped teh 2nd 8x10 square, saving it as "2". Repeat this process until all 15 have been saved.
5. Then I printed all of the 8x10's out and taped them together.

That's probably the trickiest part to explain. I hope you were able to follow (or figure out a way that works for you).
Then.... using the side of a pencil I scribbled all across the back of the printout. This way, when I trace across the front it imprints the graphite onto the board.
Flip the entire paper over, lay onto the board and pressing firmly, trace around each letter.
Once you pull up your paper, you should have a carbon copy/tracing of the print. Because the boards were so rough there were spots I had to free-hand on my own.
For the paint color, I mixed a charcoal grey and a chocolate brown. I didn't mix them completely, but rather used both colors on the brush and let it blend as I painted in the lettering.
After the words were dry, I took it out to the garage and used my rotary sander and sanded over the entire top and edges of the board to give it a nice distressed look.

Love the colors you chose. I too am planning on making this as you described. Thank you for the detailed directions. Do you recall the name of the fonts? Much thanks,
ReplyDeleteRobin
Jordan Retro 11
ReplyDeleteAir Jordan
Pandora Charms
Red Bottom Shoes For Women
Jordan 4
Pandora Official Site
Pandora Jewelry
Pandora Jewelry
Pandora Outlet
Excellent website! I adore how it is easy on my eyes it is. I am questioning how I might be notified whenever a new post has been made. Looking for more new updates. Have a great day! Hardwood Doors
ReplyDelete